BBP
Probe Tuning on NMR400
The broadband probe on NMR400 (BBP, or Varian name ATB) can be tuned to
H1/F19 and X-nucleus ranging from N15 to P31 in frequency. The tuning
capacitors (or sticks) are in the probe Box labeled BBP/ATB. Be very careful
not to touch or bend the tips when handling the capacitors.
NOTE: The default setting on this probe should be left tuned for C13
with the capacitor stick labeled 6.8.
NMR400 has only one Preamp box (dualband Preamp) for both high (H1/F19) and
low (X-nucleus) frequencies. Follow these steps to tune to the desired nucleus
frequency:
Tuning for H1 and F19
- The steps are similar to for X-nucleus (see below) except that (1) no
tuning stick is necessary and (2) use the cable leading to the H1/F19 port
on the probe.
Tuning for X-nucleus
Step 1: Set nucleus from console
- From vnmrJ command window, load the proper experiment and type
su. Check which channel is used for which nucleus by
typing tn? and dn? Tune for
tn with channel 1 and dn with channel
2.
- Alternatively, set the 1st channel to desired nucleus from under any
experiment and tune for channel 1
- Type tn='C13' or
tn='P31' or appropriate nucleus.
- Always enter su before tuning.
Step 2: Check what tuning stick to use
- Check nucleus frequency by tying sfrq? (for channel 1
tn nucleus) or dfrq? (for channel 2
dn nucleus).
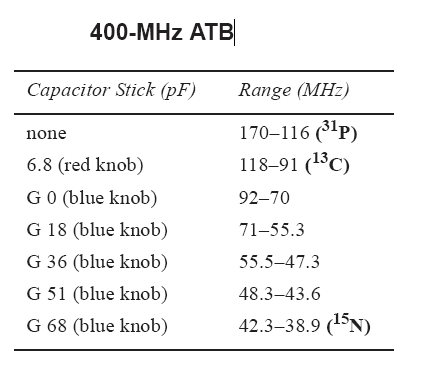
- Refer to the following table for the correct tuning stick to use
according to X-nucleus frequency

Step 3: Insert tuning capacitor to probe bottom slot (P31 does not need a
tuning capacitor)
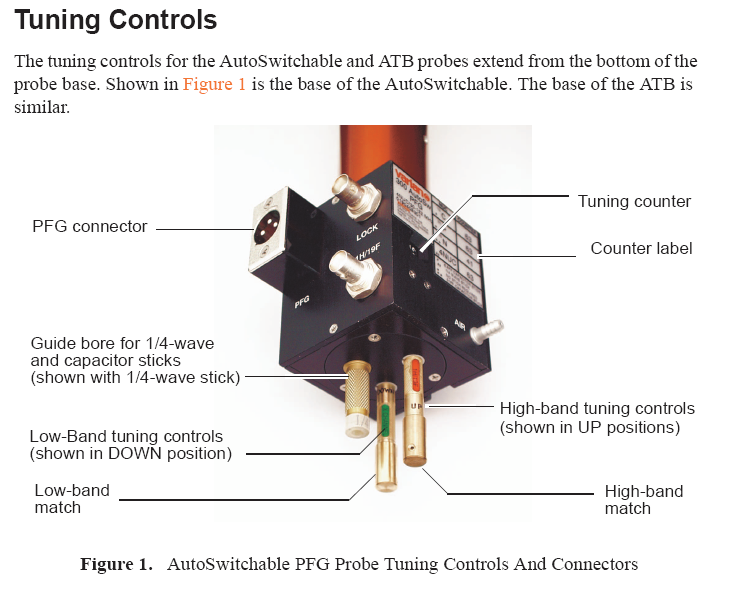
- Refer to the following figure. Insert the proper tuning capacitor to the
slot (labeled as Guide bore for 1/4-wave and capacitor sticks in figure
below). Screw on the stick but do not over-tighten it.

Step 4: Connect cables for tuning
- For X-nucleus/channel tuning, trace the cable connecting from the
X-nucleus port on the probe to the back of the magnet-console interface
(tall vertical box). Disconnect the cable from the filter and connect the
cable to the front Probe port on the tuning interface.
- Press the channel number to the proper channel number for the nucleus
(see Step 1). Set attenuation at 9 (minimum attenuation).
- To tune for X-nucleus, turn the top portion (tune) of the green controls
at the probe bottom so that tuning counter on the right side of the probe
displays a value close to the one indicated for the desired nucleus.
- Turn the bottom portion (match) of the green controls to minimize the
displayed number at the tuning interface, and iteratively turn the top
portion of the control (tune) but do not change the window display too
much. The final window display value for the nucleus should be very close
(within 1 or 2 units) to the indicated value. If the value is over 999, the
display won't show a value. Press the attenuation counter to 8, then 7 ..
until a value is displayed, then tune.
- As a last step, make sure you set the attenuation at 9 and tune.
Step 5: Install correct 1/4-wavelength filter
- Locate a short 1/4-wavelength filter covering the nucleus frequency to be
detected. The defaut cable left on the mcahine should be for C13, but check
that. Replace the cable joining the 1/4-wavelength ports in front of the
Preamp box if necessary.
Step 6: Return cabling for experiment
- Press and return the channel counter to "0".
- Disconnect the cable from the tuning interface and reconnect it to the
filter in the back of the magnet-console interface.
- Proceed with your experiment
Step 7: Note recent
arrangement with the Hayton group regarding NMR400 does not require X-channel
to be tuned back to any default nucleus after the experiment. But, if the probe
has been tuned for F19 detection, the following must be done.
- If the probe is tuned for F19 or H1, tune the probe back for H1 with the
CDCL3 sample.
H. Zhou
updated October 2011


