2D Experiment
Setup Steps
The following applies to all 1H-detected, 2D experiment setup
unless otherwise instructed.
- All 2D experiments are recommended to be conducted on NMR600.
- The following hardware setting is default and is necessary for all 2D
experiments. No user action is needed.
- Sample spinning must be turned OFF
- Temperature should be regulated (default at
25C).
- Pulsed field gradients (PFG) should be
activated.
Step 1: Load sample, lock and shim as usual.
- After shimming, keep lock level at 80-90% by increasing lock gain and/or
power.
Step 2: Set 1H spectral width in direct detect dimension
- Collect a simple 1H spectrum (nt=1 is fine) or load a
recently collected 1H spectrum with the sample.
- Process data and display full spectrum (wft aph f full).
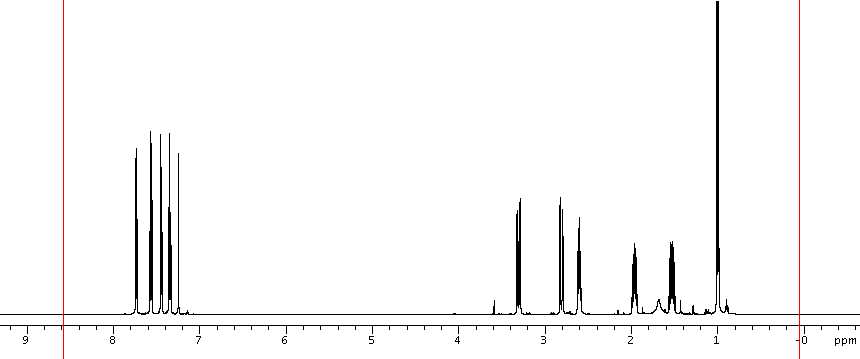
Use the box cursor (two cursor lines, see image below) to enclose the
entire signal region. Leave 5-10% baseline region to the left and right
sides of the signal region. Note: the entire signal region
with significant peaks must be enclosed between the two cursors, not just
the region you are interested in.

- Enter movesw to set the new spectral window to the
current cursor-enclosed region.
- Enter nt=1 go to recollect a quick spectrum with new
window. Enter wft aph f full to process it. Enter
setref to reference it by solvent/lock signal.
Step 3: Use the selected 1H window size and set up 2D
experiment
- Under the current experiment (from Step 2), simply enter
setexp('exp_name') to set up the 2D experiment with
current solvent and 1H spectral window. In most cases, use default values
for all other parameters. The exp_name should be replaced
with an appropriate name, i.e. ghsqc, ghmbc, ..etc.
- For multiple 2D experiments setup:
- Click Process→Text
Output. Enter explib to show current
experiment library list. Note current experiment number (exp1 is assumed
here) shown in the upper left corner of the spectrum window. This is the 1D
1H experiment with the adjusted window.
- If exp2 exists, enter jexp2. If
not, enter cexp(2) jexp2, or click
File→New Workspace and note the new
experiment number displayed.
- Enter mf(1,2) to move FID from
exp1 to exp2 (change exp# accordingly). Enter wft f full
to display data.
- Under the new experiment, enter
setexp('exp_name')
- The above procedure can be repeatedly so that
all 2D exps are set up for the sample. Write down which exp# is which
experiment.
- Check specific instructions for each experiment.
Step 4: Start experiment(s)
- To start a single experiment, simply enter go under that
experiment.
- To start multiple experiments, enter go under each
experiment #. The first experiment will start immediately and the rest will
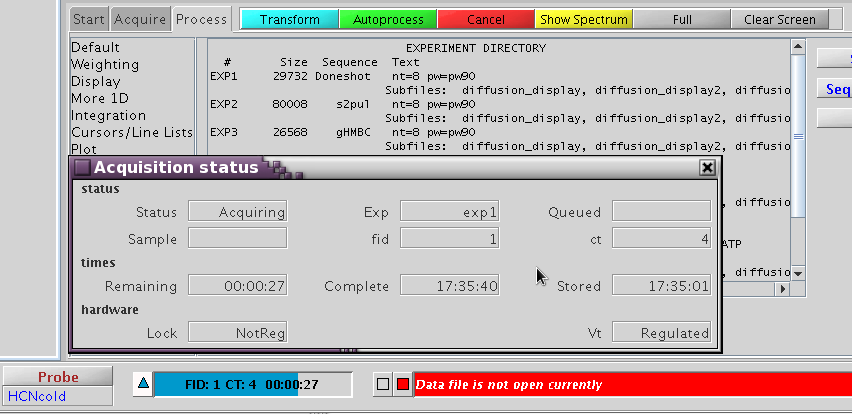
be queued and run sequentially. To check how many experiments are queued,
click the blue triangle button next to the FID status display (see image
below). An "Acquisition status" window opens and shows the current
running exp. and number of exps. queued.

To stop an experiment, depending on which experiment to be stopped,
do the following:
- Enter aa under any experiment to stop the current
running experiment. If there are queued experiments, the next one starts
immediately after the current one is stopped. Enter aa
multiple times to kill the rest of the experiments.
- To stop a specific experiment, i.e. exp3, which is queued behind other
experiment(s), first enter jexp3 to join experiment 3.
Then, enter sa (NOT aa) to remove the
current displayed experiment among the queued experiments. If exp2 is
running, sa under exp3 has on effect on exp2.
NOTE
For all 2D (or any arrayed experiment), watch for ADC or receiver overflow immediately after the
start of data collection.
- In arrayed experiments such as 2D's, a fixed gain (not
autogain) must be set. Watch the receiver overflow light on the VT monitor
next to the workstation and the ADC overflow error message immediately
after the experiment starts. The default value works most of the time
unless there is an extremely strong 1H signal in your sample. With a gain
above 20, it makes only small differences in signal/noise.
- If the receiver overflows (red light blinks on VT display) or ADC
overflow message is seen above the command area anytime during the
experiment except during the dummy scan period, it is likely the data are
ruined. Stop the experiment (enter aa), check the current
gain (gain?) and reduce gain by 2-4 at a time
(gain=22, etc), enter go and repeat the
procedure until the overflow disappears.
H. Zhou
Updated 04/2012


